1. 기본 프로젝트 설정
1) 백엔드/프론트엔드의 단순한 설정 (SpringBoot/NextJs)
2) 쿠버네티스에 배포
- ClusterIP, NodePort, LoadBalancer로 배포
#기본 쿠버네티스 설정 (백엔드 ClusterIp, 프론트엔드 NodePort)
kubectl get svc
NAME               TYPE        CLUSTER-IP      EXTERNAL-IP   PORT(S)        AGE
backend-service    ClusterIP   10.100.0.174    <none>        8080/TCP       3m47s
frontend-service   NodePort    10.99.176.202   <none>        80:30007/TCP   9s
kubernetes         ClusterIP   10.96.0.1       <none>        443/TCP        18m

#NodePort로 설정하여 External IP를 구성한 frontend
minikube service frontend-service
|-----------|------------------|-------------|---------------------------|
| NAMESPACE |       NAME       | TARGET PORT |            URL            |
|-----------|------------------|-------------|---------------------------|
| default   | frontend-service | http/80     | http://192.168.49.2:30007 |
|-----------|------------------|-------------|---------------------------|

#LoadBalancer frontend-service로 배포
kubectl apply -f frontend-service-loadbalancer

kubectl get svc
NAME               TYPE           CLUSTER-IP     EXTERNAL-IP   PORT(S)        AGE
backend-service    ClusterIP      10.100.0.174   <none>        8080/TCP       13m
frontend-service   LoadBalancer   10.97.201.99   <pending>     80:32442/TCP   43s
kubernetes         ClusterIP      10.96.0.1      <none>        443/TCP        28m

kubectl get svc frontend-service -w
NAME               TYPE           CLUSTER-IP     EXTERNAL-IP   PORT(S)        AGE
frontend-service   LoadBalancer   10.97.201.99   <pending>     80:32442/TCP   3m17s

#포트포워드로 Local의 포트와 연결 (프론트와 백엔드)
kubectl port-forward service/frontend-service 3000:80
kubectl port-forward service/backend-service 8080:8080
- minukube tunnel로 external ip 열어 외부에서 접속가능( 현재는 tunnel되지 않아 pending )
2. 설정/민감정보 주입_ConfigMap, Secret
1) configMap
- value, env, volume의 mountPath로 설정
#value로 configmap설정, configmap내용생성/조회
k create configmap todo-config --from-litera=GREETING=hi
k get configmap
NAME               DATA   AGE
greeting-config    1      7m51s

#내용교체 (--dry-run: 실행은 아닌 구성)
kubectl create configmap greeting-config --from-literal=GREETING=안녕 -o yaml --dry-run=client | kubectl replace -f -

#yaml형식으로 configmap 생성
todo-db-configmap.yaml
apiVersion: v1
kind: ConfigMap
metadata:
  name: todo-db-config
data:
  MYSQL_DATABASE: "tododb"
  MYSQL_USER: "todouser"

#deployment에 configmap반영
todo-db-deployment.yaml
apiVersion: apps/v1
kind: Deployment
metadata:
  name: todo-db
  labels:
    app: todo-db
spec:
  replicas: 1
  selector:
    matchLabels:
      app: todo-db
  template:
    metadata:
      labels:
        app: todo-db
    spec:
      containers:
        - name: mysql
          image: mysql:8.0
          ports:
            - containerPort: 3306
          envFrom:
            - configMapRef:
                name: todo-db-config
          env:
            - name: MYSQL_PASSWORD
              value: "todo1234"
            - name: MYSQL_ROOT_PASSWORD
              value: "root1234"

#minikube에 instance생성
k apply -f todo-db-configmap.yaml
k apply -f todo-db-deployment.yaml
k get po
NAME                       READY   STATUS    RESTARTS   AGE
todo-db-58bf7c64d4-575lk   1/1     Running   0          99s

#생성된 instance의 환경변수 조회
kubectl exec <pod이름> -- env
PATH=/usr/local/sbin:/usr/local/bin:/usr/sbin:/usr/bin:/sbin:/bin
HOSTNAME=todo-db-58bf7c64d4-575lk
MYSQL_DATABASE=tododb
MYSQL_USER=todouser
MYSQL_PASSWORD=todo1234
MYSQL_ROOT_PASSWORD=root1234
KUBERNETES_SERVICE_HOST=10.96.0.1
KUBERNETES_SERVICE_PORT=443
KUBERNETES_SERVICE_PORT_HTTPS=443
KUBERNETES_PORT=tcp://10.96.0.1:443
KUBERNETES_PORT_443_TCP=tcp://10.96.0.1:443
KUBERNETES_PORT_443_TCP_PROTO=tcp
KUBERNETES_PORT_443_TCP_PORT=443
KUBERNETES_PORT_443_TCP_ADDR=10.96.0.1
GOSU_VERSION=1.17
MYSQL_MAJOR=8.0
MYSQL_VERSION=8.0.43-1.el9
MYSQL_SHELL_VERSION=8.0.43-1.el9
HOME=/root
2) secret ( 보안이 필요한 민감정보 저장)
- base64로 encode
- value 혹은 env로 생성
# Value로 secret생성 및 조회
ubectl create secret generic todo-db-secret \
  --from-literal=MYSQL_PASSWORD=todo \
  --from-literal=MYSQL_ROOT_PASSWORD=root1234

k get secret
NAME             TYPE     DATA   AGE
todo-db-secret   Opaque   2

#세부 내용조회 ( base64로 encoding )
k get secret -o yaml
apiVersion: v1
items:
- apiVersion: v1
  data:
    MYSQL_PASSWORD: dG9kbw==
    MYSQL_ROOT_PASSWORD: cm9vdDEyMzQ=
  kind: Secret
  metadata:
    creationTimestamp: "2025-07-30T06:46:57Z"
    name: todo-db-secret
    namespace: default
    resourceVersion: "6765"
    uid: 4d99a134-bb28-480c-9db6-28a1a0e1a93d
  type: Opaque
kind: List
metadata:
  resourceVersion: ""

# configmap, db, backend ressource 차례로 생성
ls
README.md                       todo-db-configmap.yaml          todo-db-svc.yaml
todo-backend-deployment.yaml    todo-db-deployment.yaml

k apply -f  todo-db-configmap.yaml
k apply -f todo-db-deployment.yaml
k apply -f todo-db-svc.yaml
k apply -f todo-backend-deployment.yaml
3. Volume Mount
- 볼륨 마운트 ( 데이터 저장을 위한 volume연결 )
- 내용 변경 시 즉시 적용되나 환경변수는 실시간 업데이트 불가 ( pod재시동하는 로직 연동)
1) hostPath 방식 : 특정 호스트머신(노드)에 종속 ( Pod가 다른 노드로 옮겨지면 데이터 연동불가)
2) PV(Persistent Volume) : 볼륨이 노드에 종속되지 않음
3) PVC (Persistent Volume Claim) : 볼륨을 쿠버네티스 전체에서 사용 ( 관련 볼륨이 없으면 생성하여 pod에 배정 )
HostPath
#hostPath로 pod에 마운트 정보연결 (pod 매니페스토 내에 볼륨생성)
      volumeMounts:
        - name: my-volume
          mountPath: /data
volumes:
    - name: my-volume
      hostPath:     // Volume을 mount(로컬 파일시스템 중에 지정사용)
        path: /tmp/k8s-data # 미니큐브를 쓰면 미니큐브 내의 패스
        type: DirectoryOrCreate
PV & PVC적용
#pvc.yaml 생성
apiVersion: v1
kind: PersistentVolumeClaim
metadata:
  name: my-pvc
spec:
  storageClassName: standard
  accessModes:
    - ReadWriteOnce
  resources:
    requests:
      storage: 1Gi # 1 기가바이트(GiB)를 요청합니다.


#Pod의 manifest에 volume-mount
apiVersion: v1
kind: Pod
metadata:
  name: time-check-pod-pvc
spec:
  containers:
    - name: time-check
      image: busybox
      command: ["/bin/sh", "-c"]
      args:
        - >
          mkdir -p /data;
          while true; do
            echo "$(date)" >> /data/time.txt;
            sleep 20;
          done
      volumeMounts:
        - name: my-storage # 아래 volumes에서 정의한 볼륨 이름
          mountPath: /data
  volumes:
    - name: my-storage
      persistentVolumeClaim:
        claimName: my-pvc

#리소스 생성/조회
k apply -f pvc.yaml
k get pvc
NAME     STATUS   VOLUME                                     CAPACITY   ACCESS MODES   STORAGECLASS   VOLUMEATTRIBUTESCLASS   AGE
my-pvc   Bound    pvc-b54d3b0b-e8b9-452d-bc6b-154790c26f2c   1Gi        RWO            standard       <unset>                 16s

k apply -f pod-with-pvc.yaml
k exec time-check-pod-pvc -- cat /data/time.txt
Thu Jul 31 02:42:53 UTC 2025
Thu Jul 31 02:43:13 UTC 2025

#volume으로 저장되어 출력되는 내용확인
k delete pod time-check-pod-pvc
k apply -f pod-with-pvc.yaml
k exec time-check-pod-pvc -- cat /data/time.txt
Thu Jul 31 02:42:53 UTC 2025
Thu Jul 31 02:43:13 UTC 2025
Thu Jul 31 02:43:33 UTC 2025
Thu Jul 31 02:43:53 UTC 2025
Thu Jul 31 02:44:13 UTC 2025
Thu Jul 31 02:44:33 UTC 2025
Thu Jul 31 02:44:58 UTC 2025
환경변수 적용시 재시동 필요
kubectl create configmap nginx-conf --from-file=default.conf
configmap/nginx-conf created

kubectl apply -f default.conf -f nginx-pod.yaml
error: error validating "default.conf": error validating data: invalid object to validate; if you choose to ignore these errors, turn validation off with --validate=false

 curl localhost:8000
 echo 'server { listen 80; server_name localhost; location / { return 200 "Volume Updated!\n"; } }' > default.conf
** storage class
- minikube에는 볼륨 생성을 위한 storage class로 standard가 준비되어 있으며, claim을 반영해 볼륨 생성
k get storageclass
NAME                 PROVISIONER                RECLAIMPOLICY   VOLUMEBINDINGMODE   ALLOWVOLUMEEXPANSION   AGE
standard (default)   k8s.io/minikube-hostpath   Delete          Immediate           false                  22h
DB와 같이 데이터 영속성이 필수적인 경우에는 StatefulSet 사용 ( Deployment에 볼륨추가만으로는 기능적으로 부족, 유사하지만 추가기능이 보강된 StatefulSet, backup등의 여러가지 보완점을 생각할때 DB를 쿠버네티스로 올리는 경우는 일반적이지는 않음 )
4. StatefulSet
- DB에 적용하기 위한 구성 ( 원본과 Replica의 구분해 고유한 이름으로 생성 ( main과 backup을 구분 )
- 개별적인 영구 저장공간을 보장 (자신의 이름에 맞는 PVC 할당 및 고유한 PVC와의 연결보장 )
- pod의 생성순서, 삭제순서를 보장
- Headless Service ( 서비스 이름으로 접근해도 pod의 고유한 이름에 따라 접근 )
# Headless-service.yaml 설정(Pod의 고유성 부여)
apiVersion: v1
kind: Service
metadata:
  name: my-headless-svc
spec:
  # clusterIP: None 으로 설정하는 것이 Headless 서비스의 핵심입니다.
  clusterIP: None
  selector:
    # 이 서비스가 어떤 Pod들을 관리할지 라벨로 지정합니다.
    app: nginx-ss
  ports:
    - protocol: TCP
      port: 80
      targetPort: 80

#버전 정보를 가진 DB생성
statefulset.yaml
apiVersion: apps/v1
kind: StatefulSet # 리소스 종류는 StatefulSet 입니다.
metadata:
  name: nginx-ss
spec:
  serviceName: "my-headless-svc"
  replicas: 3
  selector:
    matchLabels:
      app: nginx-ss
  template:
    metadata:
      labels:
        app: nginx-ss
    spec:
      containers:
      - name: nginx
        image: nginx:1.21
        ports:
        - containerPort: 80
        volumeMounts:
        - name: data
          mountPath: /usr/share/nginx/html
  volumeClaimTemplates:
  - metadata:
      name: data
    spec:
      accessModes: [ "ReadWriteOnce" ]
      storageClassName: "standard" # ex02에서 확인한 StorageClass
      resources:
        requests:
          storage: 1Gi

#리소스 생성 및 인스턴스 적용
k apply -f headless-service.yaml
k get svc my-headless-svc
NAME              TYPE        CLUSTER-IP   EXTERNAL-IP   PORT(S)   AGE
my-headless-svc   ClusterIP   None         <none>        80/TCP    48s
k apply -f statefulset.yaml

# pod(명) 규칙성있게 배포됨
k get pod -l app=nginx-ss
NAME         READY   STATUS    RESTARTS   AGE
nginx-ss-0   1/1     Running   0          45s
nginx-ss-1   1/1     Running   0          36s
nginx-ss-2   1/1     Running   0          35s

#pod당 PVC가 배정되어 있음 (순서유지, 고유명칭으로 접근가능)
k get pvc
NAME              STATUS   VOLUME                                     CAPACITY   ACCESS MODES   STORAGECLASS   VOLUMEATTRIBUTESCLASS   AGE
data-nginx-ss-0   Bound    pvc-615086b2-2b1e-4cbc-9073-6383e3500383   1Gi        RWO            standard       <unset>                 91s
data-nginx-ss-1   Bound    pvc-8b082ae0-b67a-4dcb-bc5f-9ce4768be3ac   1Gi        RWO            standard       <unset>                 82s
data-nginx-ss-2   Bound    pvc-a00f2990-11b5-4e14-be22-bda635d521e7   1Gi        RWO            standard       <unset>                 81s
my-pvc            Bound    pvc-b54d3b0b-e8b9-452d-bc6b-154790c26f2c   1Gi        RWO            standard       <unset>                 49m

#scale보정
k scale statefulset nginx-ss --replicas=5
k get pod -l app=nginx-ss //증가 혹은 삭제시에도 순서를 지켜 수행됨
NAME         READY   STATUS    RESTARTS   AGE
nginx-ss-0   1/1     Running   0          3m41s
nginx-ss-1   1/1     Running   0          3m32s
nginx-ss-2   1/1     Running   0          3m31s
nginx-ss-3   1/1     Running   0          20s
nginx-ss-4   1/1     Running   0          19s
k get pod -l app=nginx-ss
NAME         READY   STATUS    RESTARTS   AGE
nginx-ss-0   1/1     Running   0          4m9s
nginx-ss-1   1/1     Running   0          4m
nginx-ss-2   1/1     Running   0          3m59s
5. Ingres
- 여러 서비스의 단일 진입점 (Single Entry Point)
1) metallb적용
- 미니 쿠베라서 external IP가 비활성화되므로 이를 활성화 해줌
( ingres 미적용시 모든 서비스에 다른 ip가 생성되어 관리하기 어려움 )
#metallb addon설정
minikube addons enable metallb ( addon받아옴 , 활성화 ip, metal loadbalancer?)
 metallb is a 3rd party addon and is not maintained or verified by minikube maintainers, enable at your own risk.
❗  metallb does not currently have an associated maintainer.
    ▪ Using image quay.io/metallb/speaker:v0.9.6
    ▪ Using image quay.io/metallb/controller:v0.9.6
🌟  The 'metallb' addon is enabled

#서로 다른 서비스 생성 및 확인
k apply -f service-a.yaml -f service-b.yaml
deployment.apps/hello-deployment created
service/hello-service created
deployment.apps/world-deployment created
service/world-service created

k get all
NAME                                    READY   STATUS              RESTARTS   AGE
pod/hello-deployment-746498bd8f-5qxwf   0/1     ContainerCreating   0          8s
pod/world-deployment-8498cb8866-4qn5p   0/1     ContainerCreating   0          8s

NAME                    TYPE           CLUSTER-IP      EXTERNAL-IP   PORT(S)        AGE
service/hello-service   LoadBalancer   10.97.255.187   <pending>     80:32203/TCP   8s
service/kubernetes      ClusterIP      10.96.0.1       <none>        443/TCP        10m
service/world-service   LoadBalancer   10.96.6.13      <pending>     80:31767/TCP   8s

NAME                               READY   UP-TO-DATE   AVAILABLE   AGE
deployment.apps/hello-deployment   0/1     1            0           8s
deployment.apps/world-deployment   0/1     1            0           8s

NAME                                          DESIRED   CURRENT   READY   AGE
replicaset.apps/hello-deployment-746498bd8f   1         1         0       8s
replicaset.apps/world-deployment-8498cb8866   1         1         0       8s
(⎈|minikube:default) elena@ijieun-ui-MacBookAir ex01 % k get all
NAME                                    READY   STATUS    RESTARTS   AGE
pod/hello-deployment-746498bd8f-5qxwf   1/1     Running   0          76s
pod/world-deployment-8498cb8866-4qn5p   1/1     Running   0          76s

NAME                    TYPE           CLUSTER-IP      EXTERNAL-IP   PORT(S)        AGE
service/hello-service   LoadBalancer   10.97.255.187   <pending>     80:32203/TCP   76s
service/kubernetes      ClusterIP      10.96.0.1       <none>        443/TCP        11m
service/world-service   LoadBalancer   10.96.6.13      <pending>     80:31767/TCP   76s

NAME                               READY   UP-TO-DATE   AVAILABLE   AGE
deployment.apps/hello-deployment   1/1     1            1           76s
deployment.apps/world-deployment   1/1     1            1           76s

NAME                                          DESIRED   CURRENT   READY   AGE
replicaset.apps/hello-deployment-746498bd8f   1         1         1       76s
replicaset.apps/world-deployment-8498cb8866   1         1         1       76s

minikube ip 192.168.49.2 // 로드밸런서 타입의 서비스에서 미니 큐브 IP를 지정

#metallb적용을 위한 구성및 리소스생성 ( metallb-config.yaml)
apiVersion: v1
kind: ConfigMap
metadata:
  namespace: metallb-system
  name: config
data:
  config: |
    address-pools:
    - name: default
      protocol: layer2
      addresses:
      - 192.168.49.50-192.168.49.99

k apply -f metallb-config.yaml

k get svc //리소스 IP확인 (외부로 개방, Pending에서 IP로 바뀜)
NAME            TYPE           CLUSTER-IP      EXTERNAL-IP     PORT(S)        AGE
hello-service   LoadBalancer   10.97.255.187   192.168.49.50   80:32203/TCP   8m56s
kubernetes      ClusterIP      10.96.0.1       <none>          443/TCP        18m
world-service   LoadBalancer   10.96.6.13      192.168.49.51   80:31767/TCP   8m56s
2) Ingress적용 (enable)
- 미니 큐브로 수행하면 특성상 외부 노출만으로는 접근 불가, 터널링 필요
#inegres enable로 구성
minikube addons enable ingress
💡  ingress is an addon maintained by Kubernetes. For any concerns contact minikube on GitHub.
You can view the list of minikube maintainers at: https://github.com/kubernetes/minikube/blob/master/OWNERS
💡  After the addon is enabled, please run "minikube tunnel" and your ingress resources would be available at "127.0.0.1"
    ▪ Using image registry.k8s.io/ingress-nginx/kube-webhook-certgen:v1.5.3
    ▪ Using image registry.k8s.io/ingress-nginx/controller:v1.12.2
    ▪ Using image registry.k8s.io/ingress-nginx/kube-webhook-certgen:v1.5.3
🔎  Verifying ingress addon...
🌟  The 'ingress' addon is enabled

#controller동작확인 ( Running이면 ingress enable )
k get pod -n ingress-nginx
NAME                                       READY   STATUS      RESTARTS   AGE
ingress-nginx-admission-create-7gcq2       0/1     Completed   0          71s
ingress-nginx-admission-patch-r7gqw        0/1     Completed   0          71s
ingress-nginx-controller-67c5cb88f-sqsfg   1/1     Running     0          71s

minikube service ingress-nginx-controller --url -n ingress-nginx
http://127.0.0.1:55970
http://127.0.0.1:55971

#인스턴스 생성
k apply -f .
ingress.networking.k8s.io/my-ingress created
deployment.apps/hello-deployment unchanged
service/hello-service configured
deployment.apps/world-deployment unchanged
service/world-service configured

k get all
NAME                                    READY   STATUS    RESTARTS   AGE
pod/hello-deployment-746498bd8f-5qxwf   1/1     Running   0          29m
pod/world-deployment-8498cb8866-4qn5p   1/1     Running   0          29m

NAME                    TYPE        CLUSTER-IP      EXTERNAL-IP   PORT(S)   AGE
service/hello-service   ClusterIP   10.97.255.187   <none>        80/TCP    29m
service/kubernetes      ClusterIP   10.96.0.1       <none>        443/TCP   39m
service/world-service   ClusterIP   10.96.6.13      <none>        80/TCP    29m

NAME                               READY   UP-TO-DATE   AVAILABLE   AGE
deployment.apps/hello-deployment   1/1     1            1           29m
deployment.apps/world-deployment   1/1     1            1           29m

NAME                                          DESIRED   CURRENT   READY   AGE
replicaset.apps/hello-deployment-746498bd8f   1         1         1       29m
replicaset.apps/world-deployment-8498cb8866   1         1         1       29m
- Ingress Controller의 내용을 바꾼 다음 외부에서 사용가능한 포트를 tunnel로 열고 브라우저로 접속해서 확인가능
- 인그레스 별도의 포트로 (8000번)로 연동하여 NodePort나 LoadBalancer로 노출가능 (별도의 추가설정 필요)
kubectl port-forward --namespace ingress-nginx service/ingress-nginx-controller 8000:80
6. HealthCheck
- liveliness Probe
#로컬에서 실행
kubectl port-forward <파드네임> 로컬포트:파트포트

#서버설정
const express = require("express");
const app = express();
const PORT = 8080;

let requestCount = 0;

# 동기적으로 CPU를 점유하여 블로킹을 시뮬레이션하는 함수
function sleep(seconds) {
  const waitUntil = new Date().getTime() + seconds * 1000;
  while (new Date().getTime() < waitUntil) {}
}

app.get("/", (req, res) => {
  requestCount++;

  # 5번째 요청마다 30초 동안 서버 전체를 멈추게 하는 버그
  if (requestCount % 5 === 0) {
    console.log(
      `Request #${requestCount}: Simulating a bug... blocking for 30 seconds.`
    );
    sleep(30);
    return res
      .status(200)
      .send(`Request #${requestCount}: Finally responding after a long delay!`);
  }

  console.log(`Request #${requestCount}: Responding normally.`);
  res
    .status(200)
    .send(
      `Hello from the buggy Node.js app! This is request #${requestCount}.`
    );
});

# Liveness Probe가 사용할 헬스 체크 엔드포인트
app.get("/healthz", (req, res) => {
  res.status(200).send("OK");
});

app.listen(PORT, () => {
  console.log(`Buggy Node.js app listening on port ${PORT}`);
});


#apiVersion: v1
kind: Pod
metadata:
  name: buggy-app-with-probe
  labels:
    app: buggy-fixed
spec:
  containers:
    - name: buggy-container
      image: captainyun/buggy-node-app:v1.0
      ports:
        - containerPort: 8080
      livenessProbe:
        httpGet:
          path: /healthz # app.js에 만든 health check 경로
          port: 8080
        initialDelaySeconds: 5 # Pod 시작 후 5초 뒤부터 검사 시작
        periodSeconds: 5 # 5초마다 검사
        failureThreshold: 1 # 1번 실패하면 바로 재시작 (의도적으로 낮게 설정하여 빠른 감지를 위함)

#새 터미널로 watch와 port-forward
watch kubectl get pod
k port-forward pot/파드이름 8080:8080
- Readiness Probe ( Rolling Update로 무중단 구현시 활용 )
#서비스 구성
apiVersion: v1
kind: Service
metadata:
  name: readiness-demo-service
spec:
  type: NodePort
  selector:
    app: readiness-app
  ports:
  - protocol: TCP
    port: 80
    targetPort: 8080
    nodePort: 30007

#Probe없는 경우
const express = require('express');
const app = express();
const PORT = 8080;

let isReady = false;

# 시작 시 15초 동안 "준비 중" 상태를 시뮬레이션
console.log("Application starting... It will be ready in 15 seconds.");
setTimeout(() => {
  isReady = true;
  console.log("Application is now ready to accept traffic!");
}, 15000); // 15초 딜레이

app.get('/', (req, res) => {
  if (isReady) {
    res.status(200).send(`Welcome version 2 ! The application is ready. Served by ${process.env.HOSTNAME}`);
  } else {
    res.status(503).send('Service is not ready yet.');
  }
});

# Readiness Probe가 사용할 헬스 체크 엔드포인트
app.get('/healthz', (req, res) => {
  if (isReady) {
    res.status(200).send('OK');
  } else {
    res.status(503).send('Not Ready');
  }
});

app.listen(PORT, () => {
  console.log(`Slow-starting app listening on port ${PORT}`);
});

watch kubectl get po
minikube service <서비스 이름> --url //접속 가능한 Path 출력
- 준비되지 않은 상태에서 접속이 되어 오류가 발생하지 않도록 구성함, RollingUpdate에 적용 ( 정상 배포 시 추가배포되는 방식으로 구성할때 서비스 중단 방지)
- StartUp Probe
- 시작 시간이 오래 걸리는 프로그램이나 프레임워크를 대기하도록 설정가능
( liveness Probe는 시작 시간이 오래 걸리는 프로그램을 기다리지 못하고 restart만 반복 )
- Startup Probe적용시 대기 후 Startup성공시 liveness Probe가 구동됨
7. Metric
- 자원의 사용을 제어 ( 메모리나 CPU사용량을 모니터 )
- Guranteed, Burstable, Best Effort순으로 안정성 보장
metric설정 및 지나친 자원요구로 인한 Instancer구동 테스트 시나리오
#metric관련 addon을 설치해야 가능
minikube addmons enable metrics-servce
watch kubectl top pod

#포트포워드로 pod 구동
k port-forward pod/pod이름 8080:8080

#pathVariable로 들어오는 값을 잡아서 실행을 시킴 (구동 프로그램)
const express = require('express');
const app = express();
const PORT = 8080;

let memoryHog = [];

app.get('/', (req, res) => {
  res.status(200).send(`
    Hello! This is a memory consumer app.
    Use /consume?mb=[number] to allocate memory.
    Current memory usage: ${Math.round(process.memoryUsage().rss / 1024 / 1024)} MB
  `);
});

#consume?mb=100 와 같이 요청하면 해당 크기의 메모리를 할당
app.get('/consume', (req, res) => {
  const mbToConsume = parseInt(req.query.mb, 10);

  if (isNaN(mbToConsume) || mbToConsume <= 0) {
    return res.status(400).send('Please provide a valid number for "mb" query parameter.');
  }

  # 1MB = 1024 * 1024 bytes. 각 element가 1 byte 이므로 해당 크기의 배열 생성
  const newAllocation = new Array(mbToConsume * 1024 * 1024).fill('x');
  memoryHog.push(newAllocation);

  const currentRssMb = Math.round(process.memoryUsage().rss / 1024 / 1024);

  console.log(`Allocated ${mbToConsume}MB. Current total memory usage: ~${currentRssMb}MB`);
  res.status(200).send(`Successfully allocated ${mbToConsume}MB. Current RSS: ${currentRssMb}MB`);
});

app.listen(PORT, () => {
  console.log(`Memory consumer app listening on port ${PORT}`);
});

# 메모리 증가함에 따라 pod구동의 경향성이 나타남
localhost:8080/consume?mb=10 //mega단위라지만 사실상 더 많이 증가, watch에서 메모리 사용량 증가확인
localhost:8080/consume?mb=20 //급증함
localhost:8080/consume?mb=30 //급증함
localhost:8080/consume?mb=50 //이 정도에서 거의 멈추듯이 느려짐

# limit을 주는 옵션의 설정 추가( metric에 대해 request에 대해 대응)
apiVersion: v1
kind: Pod
metadata:
  name: memory-eater-with-limits
spec:
  containers:
  - name: memory-eater-container
    image: captainyun/resource-app:v1.0
    ports:
    - containerPort: 8080
    resources:
      limits:
        memory: "128Mi" # 메모리 사용을 128 Mebibytes 로 제한
        cpu: "500m"     # CPU 사용을 0.5 core 로 제한
      requests:
        memory: "64Mi"  # 최소 64 Mebibytes 의 메모리를 보장 요청
        cpu: "250m"     # 최소 0.25 core 의 CPU를 보장 요청
8. Helm
#helm 설치 및 확인
curl -fsSL -o get_helm.sh https://raw.githubusercontent.com/helm/helm/main/scripts/get-helm-3

helm version
version.BuildInfo{Version:"v3.17.3", GitCommit:"e4da49785aa6e6ee2b86efd5dd9e43400318262b", GitTreeState:"clean", GoVersion:"go1.24.2"}

#차트생성 및 문법오류확인
helm create my-first-chart
helm lint ./my-first-chart/
==> Linting ./my-first-chart/
[INFO] Chart.yaml: icon is recommended
1 chart(s) linted, 0 chart(s) failed

#template내의 내용들은 {{}}으로 정의되어 있으며 완전한 resource로 helm이 만들어주는것
helm template my-first-release ./my-first-chart/  //object를 살펴보는 명령

--- 관련 세부내용
#Source: my-first-chart/templates/serviceaccount.yaml
apiVersion: v1
kind: ServiceAccount
metadata:
  name: my-first-release-my-first-chart
  labels:
    helm.sh/chart: my-first-chart-0.1.0
    app.kubernetes.io/name: my-first-chart
    app.kubernetes.io/instance: my-first-release
    app.kubernetes.io/version: "1.16.0"
    app.kubernetes.io/managed-by: Helm
automountServiceAccountToken: true
---
# Source: my-first-chart/templates/service.yaml
apiVersion: v1
kind: Service
metadata:
  name: my-first-release-my-first-chart
  labels:
    helm.sh/chart: my-first-chart-0.1.0
    app.kubernetes.io/name: my-first-chart
    app.kubernetes.io/instance: my-first-release
    app.kubernetes.io/version: "1.16.0"
    app.kubernetes.io/managed-by: Helm
spec:
  type: ClusterIP
  ports:
    - port: 80
      targetPort: http
      protocol: TCP
      name: http
  selector:
    app.kubernetes.io/name: my-first-chart
    app.kubernetes.io/instance: my-first-release
---
# Source: my-first-chart/templates/deployment.yaml
apiVersion: apps/v1
kind: Deployment
metadata:
  name: my-first-release-my-first-chart
  labels:
    helm.sh/chart: my-first-chart-0.1.0
    app.kubernetes.io/name: my-first-chart
    app.kubernetes.io/instance: my-first-release
    app.kubernetes.io/version: "1.16.0"
    app.kubernetes.io/managed-by: Helm
spec:
  replicas: 1
  selector:
    matchLabels:
      app.kubernetes.io/name: my-first-chart
      app.kubernetes.io/instance: my-first-release
  template:
    metadata:
      labels:
        helm.sh/chart: my-first-chart-0.1.0
        app.kubernetes.io/name: my-first-chart
        app.kubernetes.io/instance: my-first-release
        app.kubernetes.io/version: "1.16.0"
        app.kubernetes.io/managed-by: Helm
    spec:
      serviceAccountName: my-first-release-my-first-chart
      containers:
        - name: my-first-chart
          image: "nginx:1.16.0"
          imagePullPolicy: IfNotPresent
          ports:
            - name: http
              containerPort: 80
              protocol: TCP
          livenessProbe:
            httpGet:
              path: /
              port: http
          readinessProbe:
            httpGet:
              path: /
              port: http
---
# Source: my-first-chart/templates/tests/test-connection.yaml
apiVersion: v1
kind: Pod
metadata:
  name: "my-first-release-my-first-chart-test-connection"
  labels:
    helm.sh/chart: my-first-chart-0.1.0
    app.kubernetes.io/name: my-first-chart
    app.kubernetes.io/instance: my-first-release
    app.kubernetes.io/version: "1.16.0"
    app.kubernetes.io/managed-by: Helm
  annotations:
    "helm.sh/hook": test
spec:
  containers:
    - name: wget
      image: busybox
      command: ['wget']
      args: ['my-first-release-my-first-chart:80']
  restartPolicy: Never

//install
helm install my-first-release ./my-first-chart/
NAME: my-first-release
LAST DEPLOYED: Mon Aug  4 14:35:33 2025
NAMESPACE: default
STATUS: deployed
REVISION: 1
NOTES:
1. Get the application URL by running these commands:
  export POD_NAME=$(kubectl get pods --namespace default -l "app.kubernetes.io/name=my-first-chart,app.kubernetes.io/instance=my-first-release" -o jsonpath="{.items[0].metadata.name}")
  export CONTAINER_PORT=$(kubectl get pod --namespace default $POD_NAME -o jsonpath="{.spec.containers[0].ports[0].containerPort}")
  echo "Visit http://127.0.0.1:8080 to use your application"
  kubectl --namespace default port-forward $POD_NAME 8080:$CONTAINER_PORT

# helm으로 한번에 생성가능 (서비스, replicaset, pod생성)
helm list
NAME                    NAMESPACE       REVISION        UPDATED                                 STATUS          CHART                   APP VERSION
my-first-release        default         1               2025-08-04 14:35:33.222913 +0900 KST    deployed        my-first-chart-0.1.0    1.16.0

#삭제
helm uninstall my-first-release
release "my-first-release" uninstalled
9. Monitoring
- Prometheus (코어 역할, 데이터 자체를 추출) + Grafana (식별하기 어려운 Metric데이터 시각화) 조합
- 이용자수 ( 예: 시간별 이용자수를 체크 ), 상품 ( 판매된 상품의 갯수, 총 가격의 합 등 ) , Alarm등의 연동 가능
1) 프로메테우스
- 기본 설정에 대한 내용이 출력 ( 개별 구성한 Application의 Metric은 별도의 설정필요 )
설치 및 활용
#namespace생성
kubectl create namespace monitor

#repository추가 (helm chart를 받아옴)
helm repo add prometheus-community https://prometheus-community.github.io/helm-chartshelm repo update

#repo최신화
helm repo update

#namespace에 설치
helm install kube-prom-stack prometheus-community/kube-prometheus-stack --namespace monitor
NAME: kube-prom-stack
LAST DEPLOYED: Wed Aug  6 10:34:10 2025
NAMESPACE: monitor
STATUS: deployed
REVISION: 1
NOTES:
kube-prometheus-stack has been installed. Check its status by running:
  kubectl --namespace monitor get pods -l "release=kube-prom-stack"
Get Grafana 'admin' user password by running:
  kubectl --namespace monitor get secrets kube-prom-stack-grafana -o jsonpath="{.data.admin-password}" | base64 -d ; echo
Access Grafana local instance:
  export POD_NAME=$(kubectl --namespace monitor get pod -l "app.kubernetes.io/name=grafana,app.kubernetes.io/instance=kube-prom-stack" -oname)
  kubectl --namespace monitor port-forward $POD_NAME 3000
Visit https://github.com/prometheus-operator/kube-prometheus for instructions on how to create & configure Alertmanager and Prometheus instances using the Operator.

#Pod 확인
kubectl --namespace monitor get pods -l "release=kube-prom-stack"
NAME                                                   READY   STATUS    RESTARTS   AGE
kube-prom-stack-kube-prome-operator-6f6857b96f-6kbcp   1/1     Running   0          2m45s
kube-prom-stack-kube-state-metrics-6c4dc9d54-wn9sv     1/1     Running   0          2m45s
kube-prom-stack-prometheus-node-exporter-9tqlg         1/1     Running   0          2m45s

혹은
kubectl --namespace monitor get all

#Dash보드 접속 (기본 포트 9090)
kubectl port-forward service/kube-prom-stack-kube-prome-prometheus 9090:9090 -n monitor
Forwarding from 127.0.0.1:9090 -> 9090
Forwarding from [::1]:9090 -> 9090
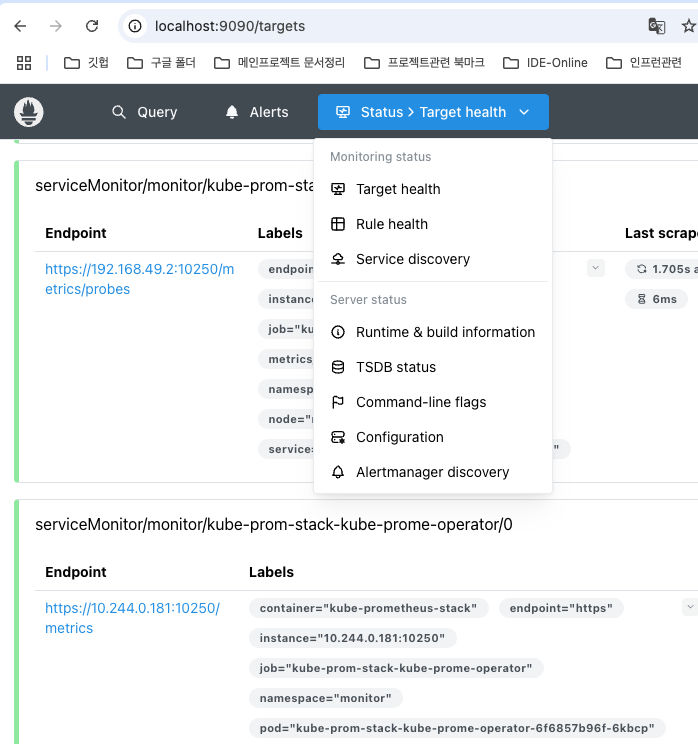

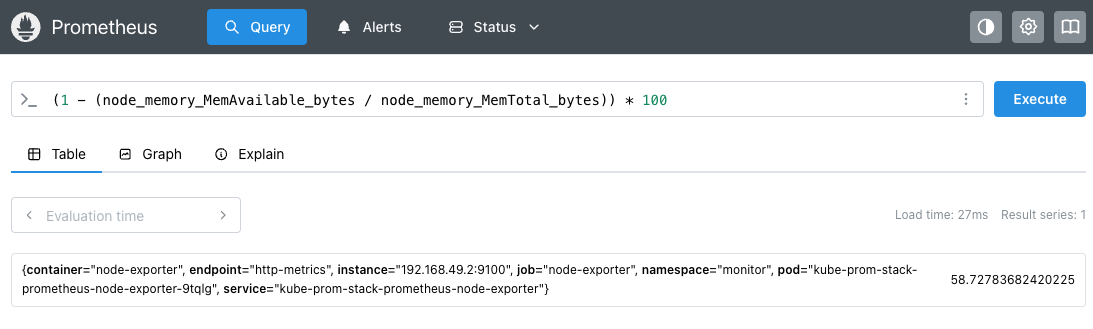
100 - (avg by(instance) (rate(node_cpu_seconds_total{mode="idle"}[5m])) * 100)
-> 이러한 쿼리를 grafana에서 활용하여 시각화 ( 시계열 메트릭 수집이 가능한 구조 )
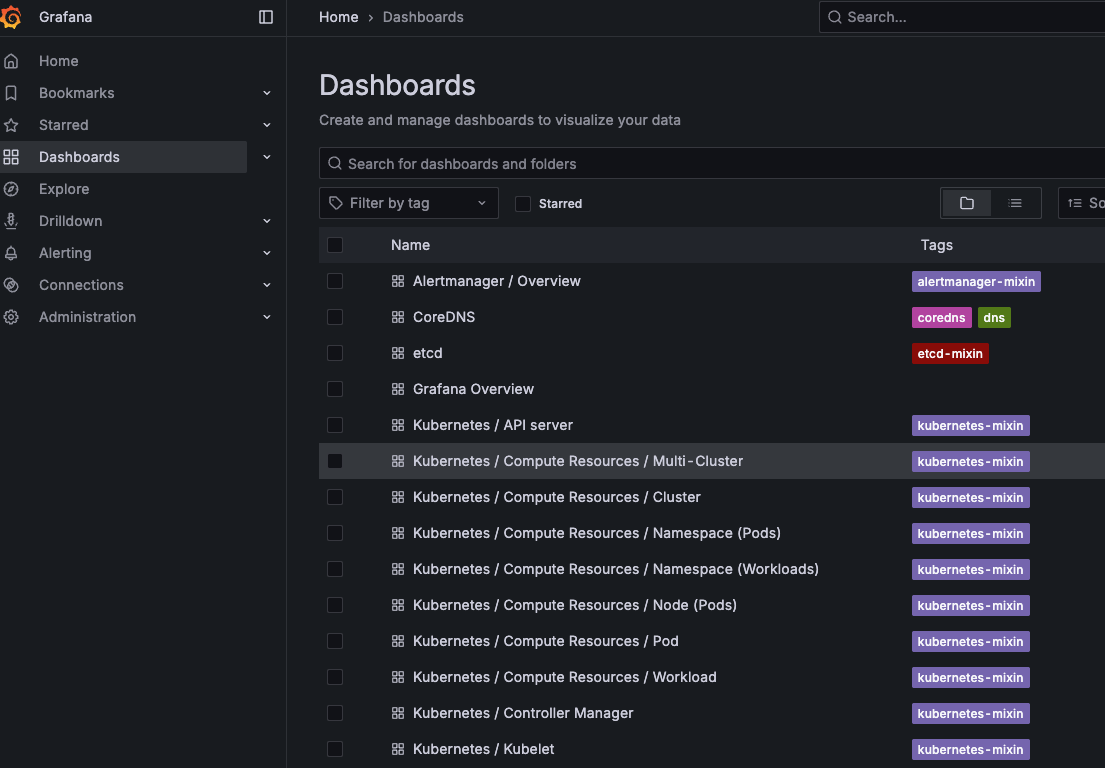
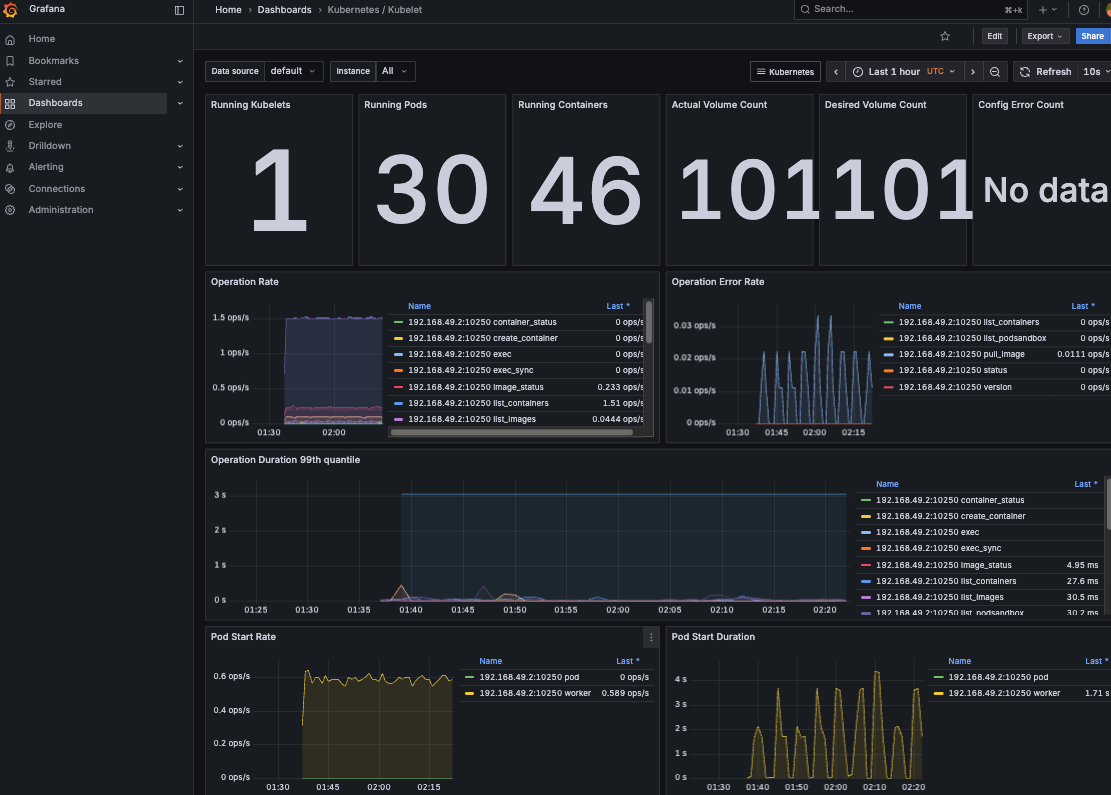
2) 그라파나 (시각화)
kubectl port-forward svc/kube-prom-stack-grafana 3000:80 -n monitor
-----------------------------------------------------------------------------
미니큐브를 이용한 쿠버네티스 설정을 연습했다.
추가 1의 코드는 쿠버네티스의 각 구성을 익히기 위해 nginx로 구성된 연습용이며,
뒤이은 추가 2는 2개의 간단한 프로젝트를 구현해서 CI/CD로 구성하는 실습까지 추가로 진행하여
그 일부를 기록으로 남긴다.
'INFRA > Kubernetes' 카테고리의 다른 글
| 쿠버네티스_추가 (2, CI/CD실습 ) (7) | 2025.08.10 |
|---|
